|
|
【瑞萨RA4系列开发板体验】用DAC输出正弦波以及余弦波
作者:hehung
前言
本文的目的在与使用DAC模块输出正弦波与余弦波波形,用于测试RA4M2单片机的DAC输出功能,本文实现如下功能: - 本文基于KEIL开发环境;
- 使用了两路DAC(RA4M2本来也只有两路DAC),DAC0输出正弦波,DAC1输出余弦波;
- 示波器用于观察正弦波波形以及余弦波波形。
本文中实用到了所有驱动都能在我之前的文章中找到使用方法,有需要请参考。
硬件连接
查看原理图,了解芯片的DAC引脚的映射关系,我们才能接下来的工作。
RA4M2有两路DAC,没录DAC可以输出一个DAC信号。
本文两路DAC都使用到了,DAC0连接P014,DAC1连接P015。

RASC配置
知道了DAC的引脚映射关系,接下来就开始我们的驱动配置了,打开RASC,打开方式不细说,请参考我之前的文章。
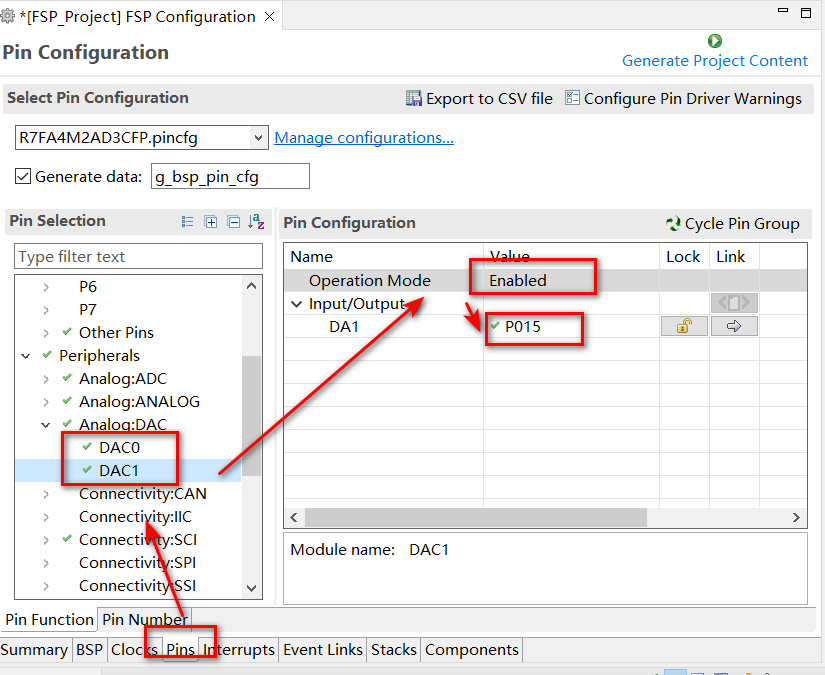
使能DAC引脚
如下图,选中Pins->Analog AC,使能ADC0与DAC1,会自动匹配引脚。 AC,使能ADC0与DAC1,会自动匹配引脚。
DAC详细配置
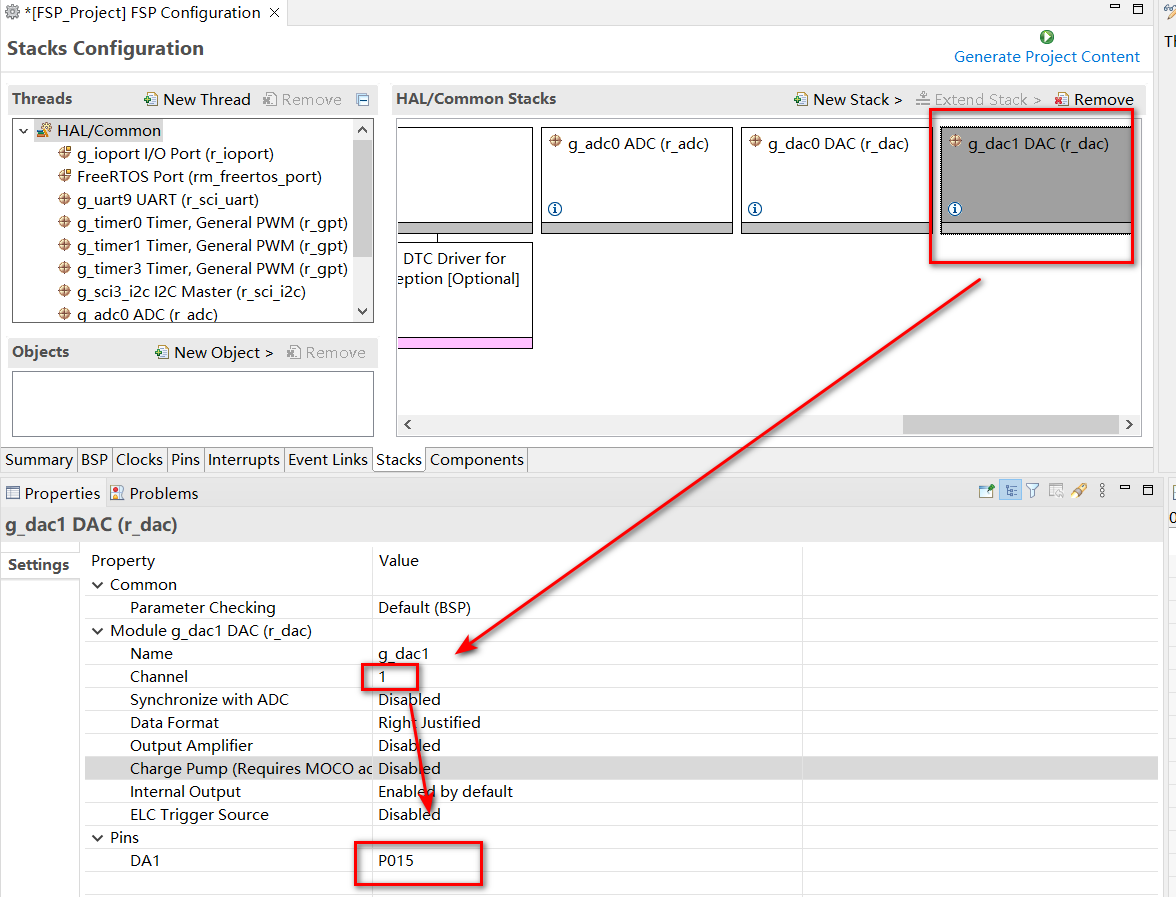
因为使用到了两路DAC,所以需要配置两个DAC Stack,配置方式一样,要注意两路DAC的unit是不一样的,根据实际情况填写0或者1。
配置十分简单,不做赘述,详见下图。


代码实现
我新建了一个app_dac.c以及app_dac.h,代码实现逻辑不细说,瑞萨已经封装的很好了,理解起来很简单。
app_dac.c
我在封装了一层,主要包括DAC初始化以及DAC输出。
Dac_OutputVal()输出电压值(0到4096分别表示0~3.3V)
- /*
- @hehung
- 2022-12-01
- */
- #include "hal_data.h"
- #include "app_dac.h"
- /* Initialize the DAC */
- void Dac_Init(void)
- {
- fsp_err_t err = FSP_SUCCESS;
-
- /* Initializes the dac. */
- err = R_DAC_Open(&g_dac0_ctrl, &g_dac0_cfg);
- /* Handle any errors. This function should be defined by the user. */
- assert(FSP_SUCCESS == err);
-
- /* Initializes the dac1. */
- err = R_DAC_Open(&g_dac1_ctrl, &g_dac1_cfg);
- /* Handle any errors. This function should be defined by the user. */
- assert(FSP_SUCCESS == err);
- }
- /* Control the DAC output a digit valtage value */
- void Adc_OutputVal(e_Dac_HwUnitType dac_num, uint16_t val)
- {
- fsp_err_t err = FSP_SUCCESS;
-
- if (DAC_DAC0 == dac_num)
- {
- err = R_DAC_Start(&g_dac0_ctrl);
- /* Handle any errors. This function should be defined by the user. */
- assert(FSP_SUCCESS == err);
-
- R_DAC_Write(&g_dac0_ctrl, val);
- }
- else
- {
- err = R_DAC_Start(&g_dac1_ctrl);
- /* Handle any errors. This function should be defined by the user. */
- assert(FSP_SUCCESS == err);
-
- R_DAC_Write(&g_dac1_ctrl, val);
- }
- }
- /*
- @hehung
- 2022-12-01
- */
- #ifndef APP_DAC_H_
- #define APP_DAC_H_
- #include "stdint.h"
- typedef enum
- {
- DAC_DAC0 = 0,
- DAC_DAC1
- } e_Dac_HwUnitType;
- extern void Dac_Init(void);
- extern void Adc_OutputVal(e_Dac_HwUnitType dac_num, uint16_t val);
- #endif
主函数实现
主函数中用于输出正弦波以及余弦波,每一秒输出一次。
输出算法实用到了数学库math.h中的sin公式。
sin都学过,不做赘述,参数参数0~2π会输出一个正弦波形,代码中没1毫秒输出一次,sin函数的参数的增长步长为0.05。详细代码见下。
- #define PI_MATH (3.14)
- #define PI_DOUBLE (PI_MATH * 2)
- uint16_t dac_value[2];
- double time_cnt;
- void hal_entry(void)
- {
- /* Initialize the uart for implement the 'printf' and 'scanf' */
- Uart_Init();
- /* Initialize the I2c */
- I2c_Init();
- /* Initialize the OLED */
- OLED_Init();
- /* Initialize the ADC */
- Adc_Init();
- /* Initialize the DAC */
- Dac_Init();
-
- OLED_ShowString(12, 0, (const uint8_t*)"R7FA4M2AD3CFP", 16, 1);
- // OLED_ShowHzStringRow(32, 24, (const char*)"电子发烧友", 1);
- OLED_ShowString(0, 16, (const uint8_t*)"elecfans", 16, 1);
- OLED_ShowString(64, 16, (const uint8_t*)"|hehung", 16, 1);
- OLED_ShowString(32, 32, (const uint8_t*)"DAC Test", 16, 1);
- OLED_Refresh_Gram();
-
- while (1)
- {
- dac_value[0] = (uint16_t)(sin(time_cnt) * (float)2048) + 2048;
- dac_value[1] = (uint16_t)(sin(time_cnt + 0.5*PI_MATH) * (float)2048) + 2048;
- Adc_OutputVal(DAC_DAC0, dac_value[0]);
- Adc_OutputVal(DAC_DAC1, dac_value[1]);
- time_cnt = (time_cnt > PI_DOUBLE) ? (0.0): (time_cnt + 0.05f);
- R_BSP_SoftwareDelay(1, BSP_DELAY_UNITS_MILLISECONDS);
- }
- #if BSP_TZ_SECURE_BUILD
- /* Enter non-secure code */
- R_BSP_NonSecureEnter();
- #endif
- }
显示效果
从示波器的观测波形可以看出,输出波形还是比较完美的,说明RA4M2的DAC功能还是比较强大,能够模拟各种波形输出。
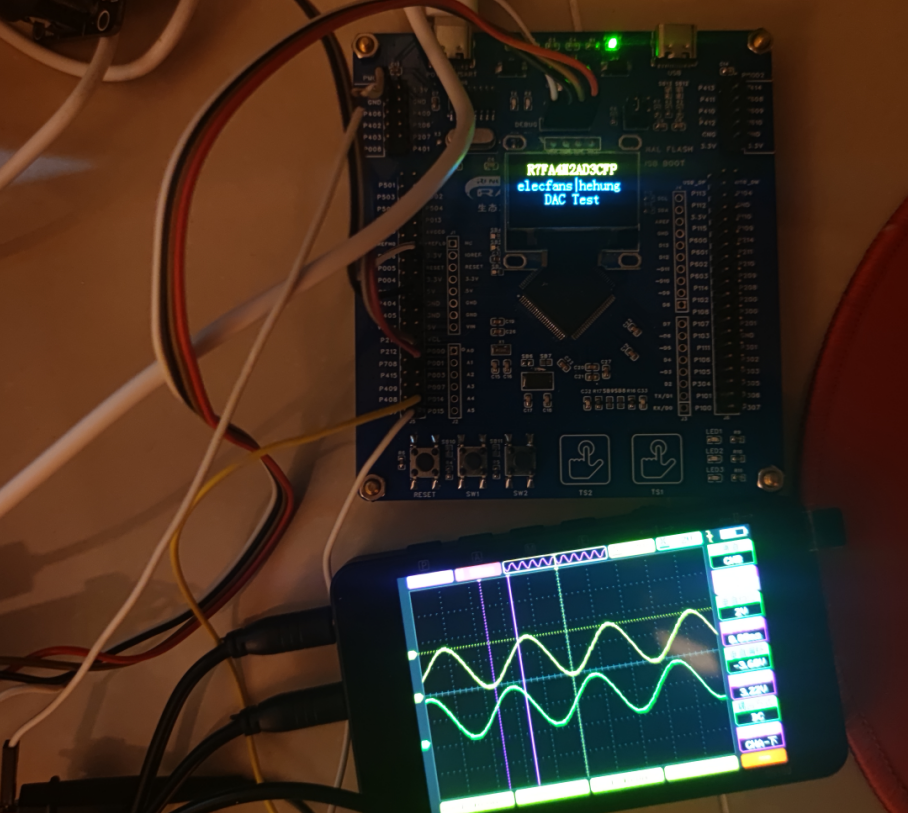
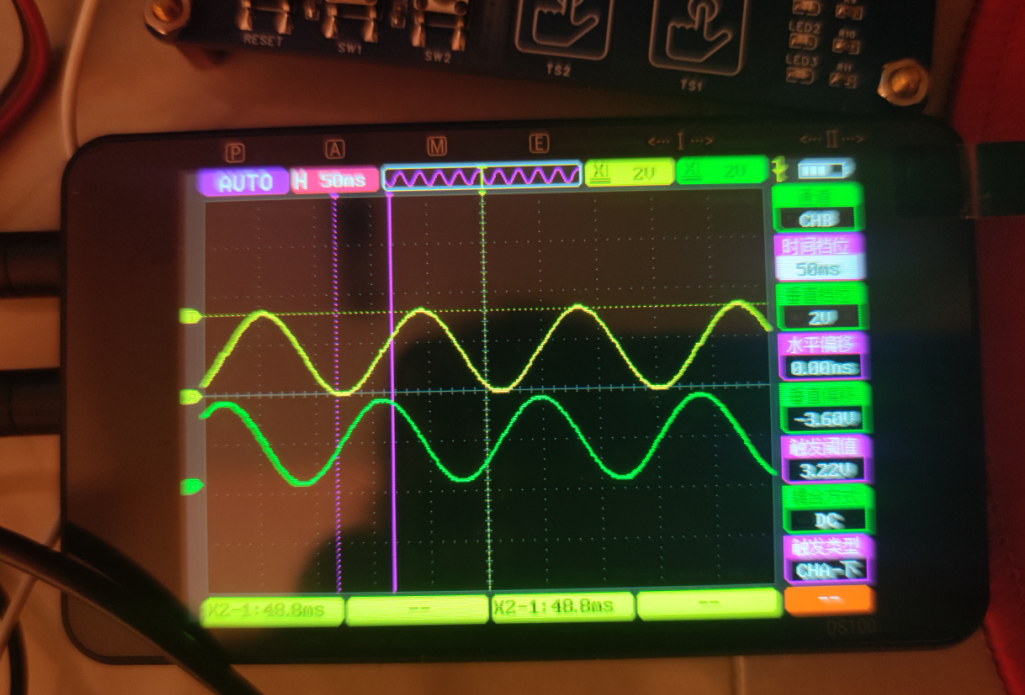
视频演示
|
|


 发表于 2023-2-8 15:44:07

 发表于 2023-3-14 10:33:03